
In today's rapidly evolving data landscape, achieving seamless data integration and high-performance stream processing has never been more critical. While Apache Kafka and Kafka Connect have long been the go-to solutions for many organizations, they often come with a steep learning curve and an intricate ecosystem that can slow down development cycles.
Enter Conduit and Redpanda: a match made in data streaming heaven. Conduit's intuitive, developer-friendly platform joins forces with Redpanda's lightning-fast, Kafka-compatible data streaming engine to offer an alternative that's not just easier to use, but also significantly outperforms traditional setups in terms of throughput and latency. From simplified configurations and resource-efficient architecture, the Conduit-Redpanda combo makes data integration and stream processing faster, smoother, and more scalable than ever before.
The Pain Points of Kafka and Kafka Connect
Navigating the world of Kafka and Kafka Connect often feels like walking through a maze of complexities. Right from the start, you're faced with a steep learning curve and intricate configurations, but that's just the tip of the iceberg. What's lurking below the surface are the real monsters: infrastructure and performance challenges. Setting up and maintaining a Kafka cluster requires not just expertise but also significant system resources. The platform's high CPU and memory consumption can put a strain on your infrastructure, causing performance bottlenecks that are tough to resolve.
And while Kafka Connect brings the promise of simplifying data integration tasks, it comes with its own set of challenges that can quickly turn into downsides. One glaring issue is its intricate configuration process. Even simple integrations often require verbose and complex JSON configurations, making the initial setup a time-consuming affair. Additionally, Kafka Connect's scalability and performance don't always meet the mark, especially when handling large volumes of data. The system's resource consumption can escalate quickly, necessitating a beefy infrastructure to maintain optimal performance. This leads to added costs and complexity, eroding the supposed ease-of-use that Kafka Connect aims to offer.
Conduit + Redpanda: A Perfect Pairing
Redpanda is a Kafka replacement written from the ground up in C++ and Conduit is a Kafka Connect replacement built in Go. Neither one of the platforms have dependencies on the JVM or Zookeeper to move data and are Kafka wire protocol compliant. Conduit's UI eliminates the need for verbose configurations, streamlining the data integration process. Additionally, Conduit has an already established and growing list of open source connectors and a Connector SDK with an accompanying suite of tests that enables you to write your own high-quality, performant custom connectors. Redpanda outperforms Kafka in terms of speed and latency while consuming fewer system resources. This allows for a more efficient utilization of hardware, reducing operational costs. Both tools are designed with a focus on developer experience, making it easier to set up, manage, and scale data streams. Together, Redpanda and Conduit provide a more performant, resource efficient, and developer friendly alternative to Kafka and Kafka Connect.
Getting Started
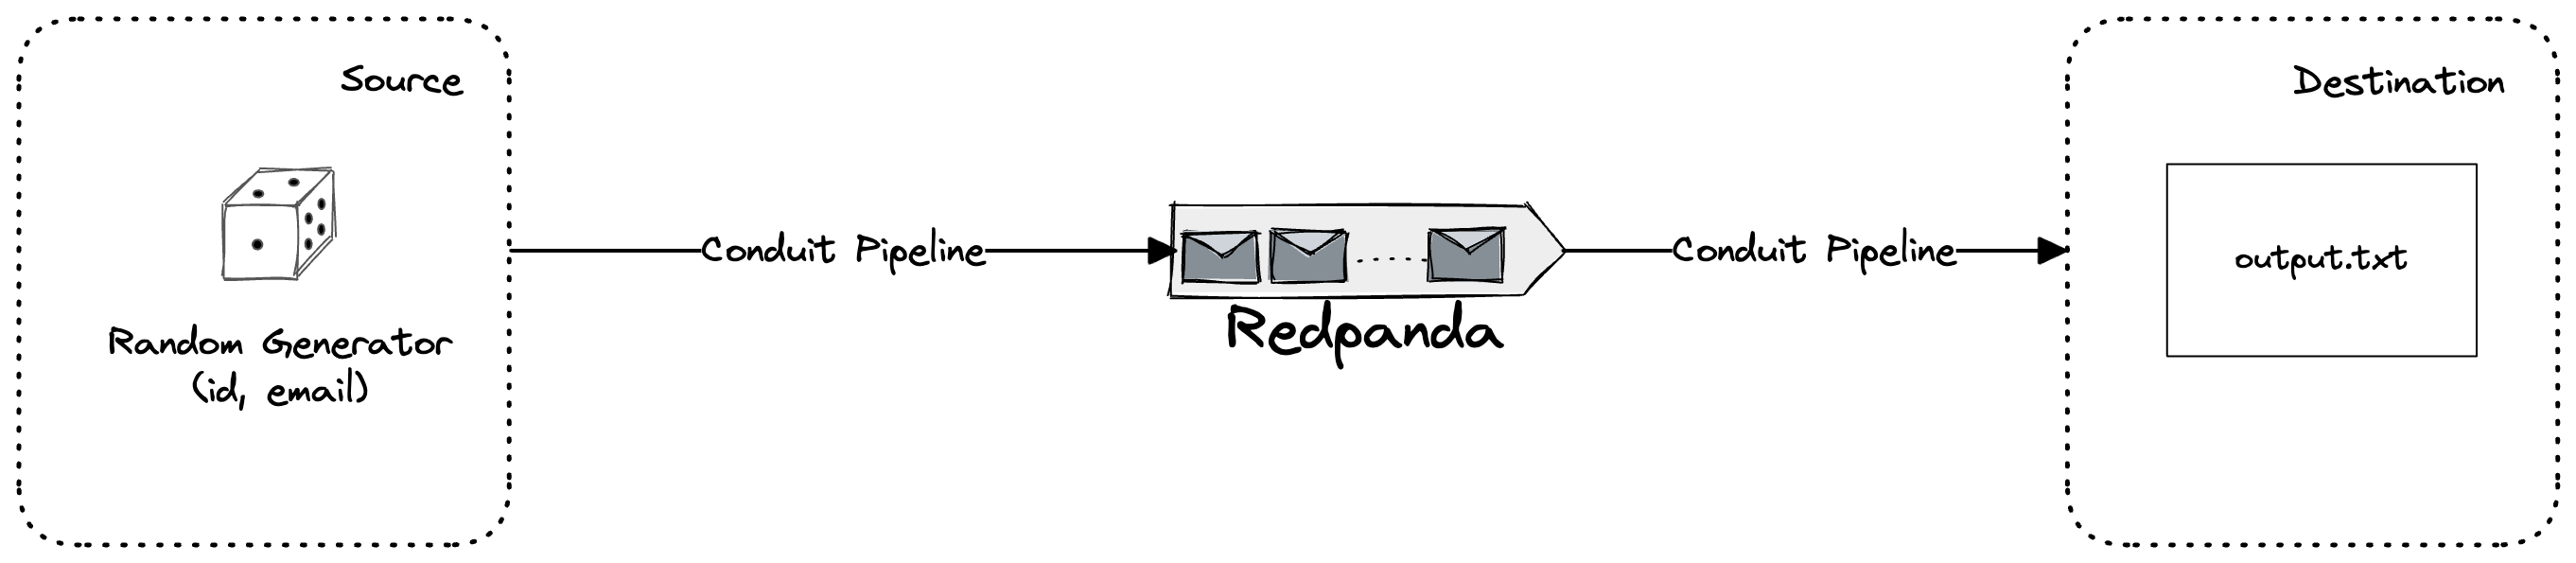
To show you how easy it is to get started with Conduit and Redpanda, we’re going to build a simple pipeline that generates random information from a builtin Conduit connector into a Redpanda topic. Conduit will consume that information and output it into a file.
Installation
Installing Conduit and Redpanda is pretty simple. Follow the step-by-step guides (Conduit Guide,Redpanda Guide) to get your data streaming in no time. We’re going to use the Redpanda CLI, rpk, to create topics, producers, and consumers. Follow the instructions to download and install for your specific environment.
Running Redpanda and Creating a Topic
- Start the Redpanda cluster
$ rpk container start -n 3 # creates a 3-node cluster- Create a topic named
conduit-demo
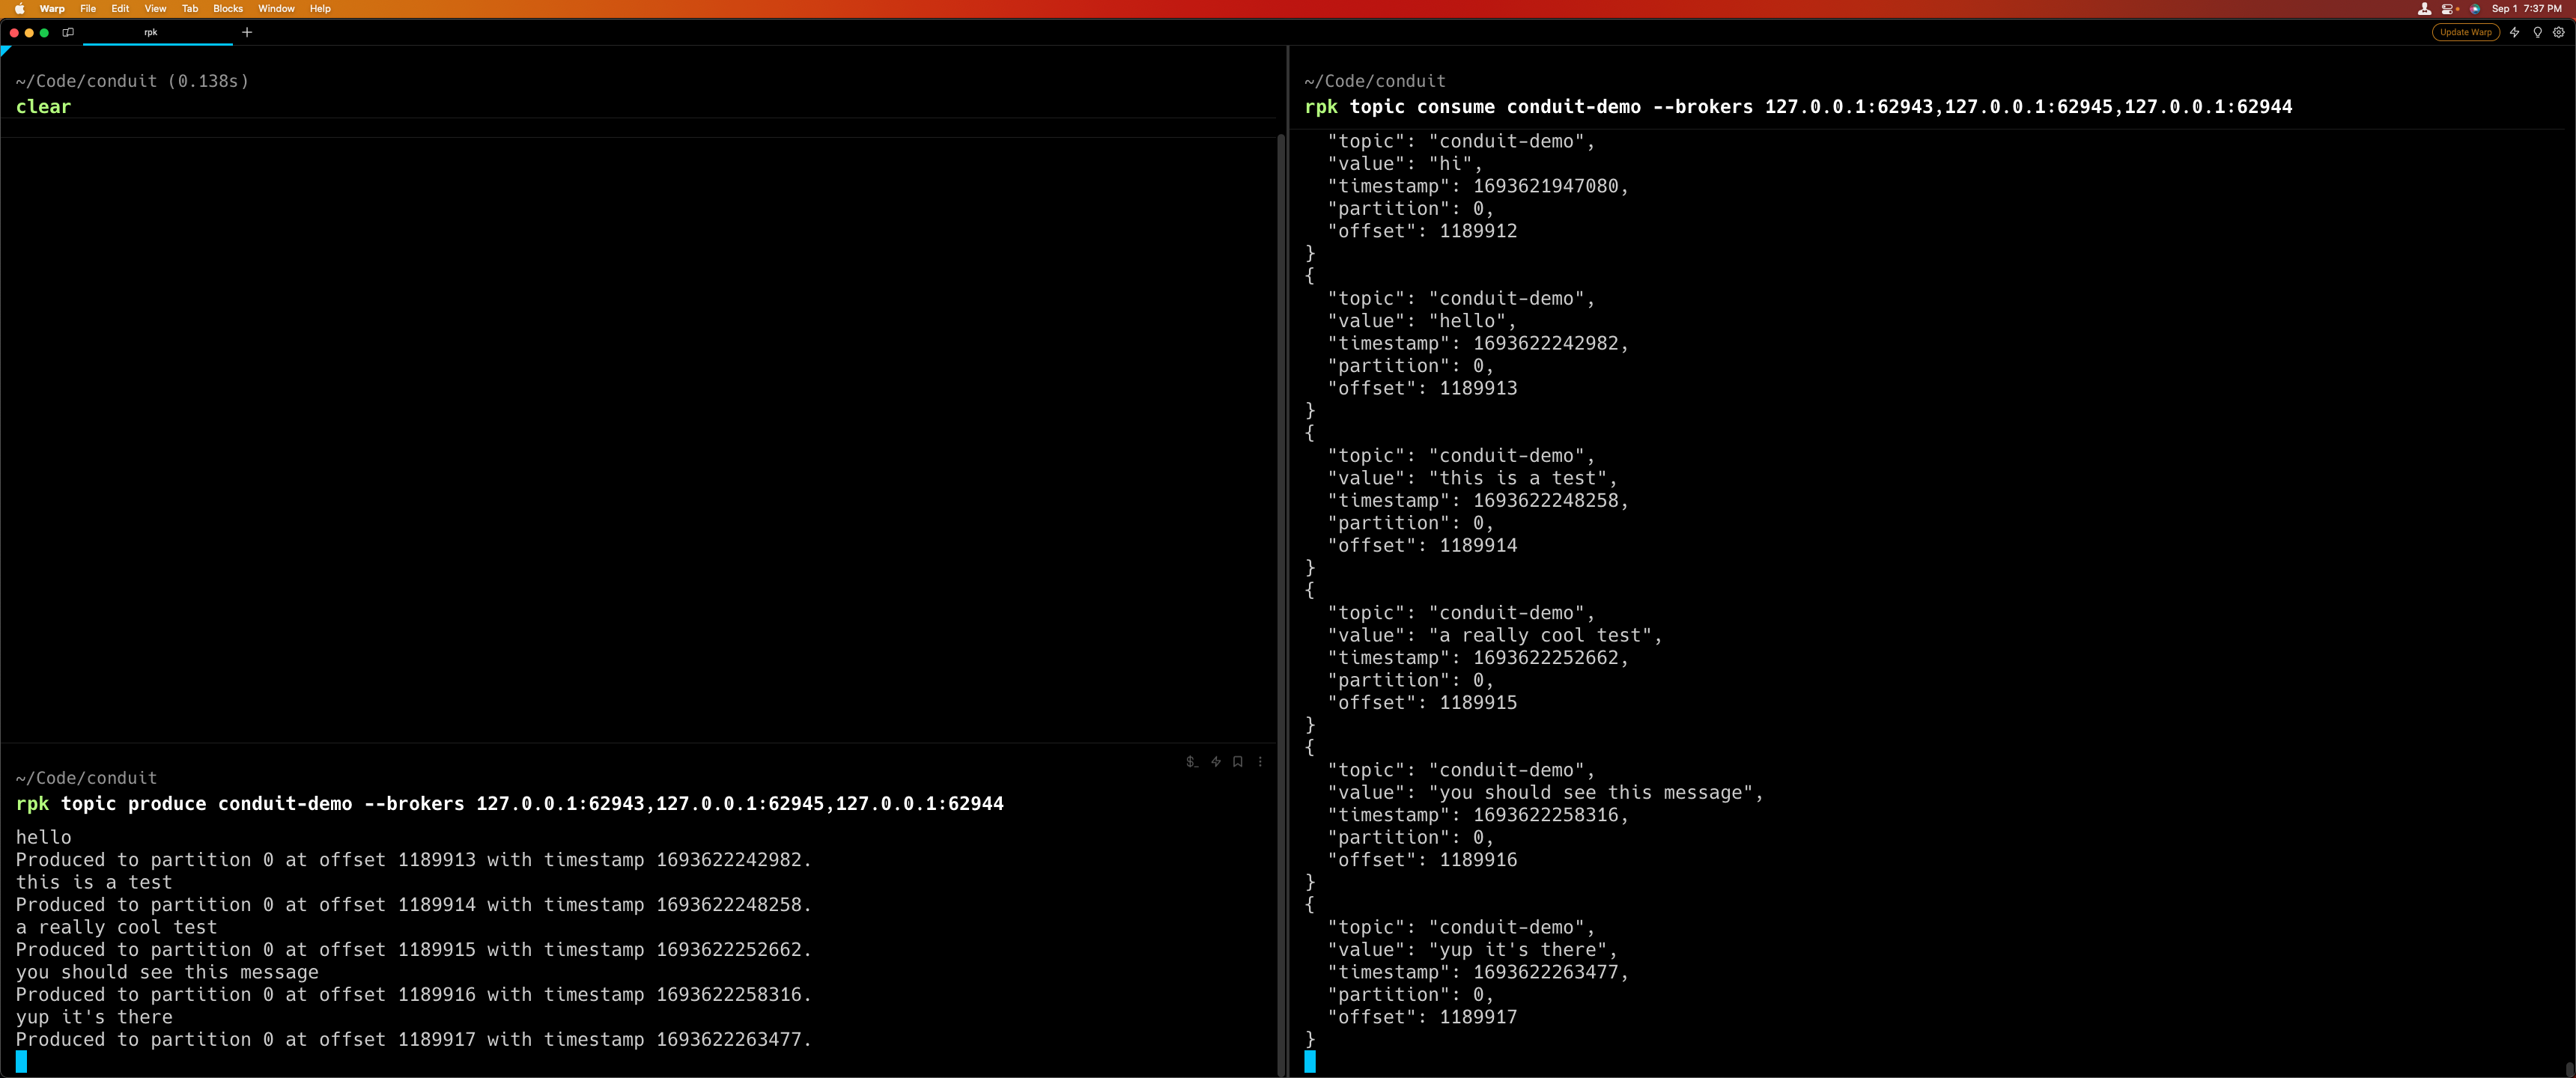
$ rpk topic create conduit-demo # creates a topic- To test if everything is working open up a new terminal window(you should have two open right now). In the new window run:
$ rpk topic consume conduit-demo --brokers <broker1_addr>,<broker2_addr>...- In the original window run the following command. Type text into the producer window as shown in the picture below
$ rpk topic produce conduit-demo --brokers <broker1_addr>,<broker2_addr>...You should see the following:
Configuring and Running the Conduit Pipeline
You can build pipelines three ways with Conduit: built-in UI, API, and using pipelines configuration files. For this example, we’ll use the pipeline configuration files. For more detailed specs on all the configuration options for pipeline configuration, you can look at the docs and reference each of the specific connector configuration options in their respective Github repos.
- Create a folder called
pipelinesat the same level as your Conduit binary. Inside of that folder create a file namedrand-rp-file.yml - Copy the following code block into
rand-rp-file.yml
version: 2.0 pipelines: - id: randorpfile # Pipeline ID [required] status: running # Pipeline status at startup (running or stopped) description: random generator to file using redpanda connectors: # List of connector configurations - id: rando_src # Connector ID [required] type: source # Connector type (source or destination) [required] plugin: builtin:generator # Connector plugin [required] settings: # A map of configuration keys and values for the plugin (specific to the chosen plugin) format.type: raw # This property is specific to the generator plugin format.options: "id:int,email:string" # This property is specific to the generator plugin - id: rp_dest # [required] type: destination # [required] plugin: builtin:kafka # [required] settings: servers: "<broker1_addr,broker2_addr,broker3_addr>" # [required] topic: conduit-demo # [required] - id: rp_src # [required] type: source # [required] plugin: builtin:kafka # [required] settings: servers: "<broker1_addr,broker2_addr,broker3_addr>" # [required] topic: conduit-demo # [required] - id: file_dest # [required] type: destination # [required] plugin: builtin:file # [required] settings: path: ./output.txt # [required]- Run the Conduit server from your terminal:
$ ./conduit- Navigate to
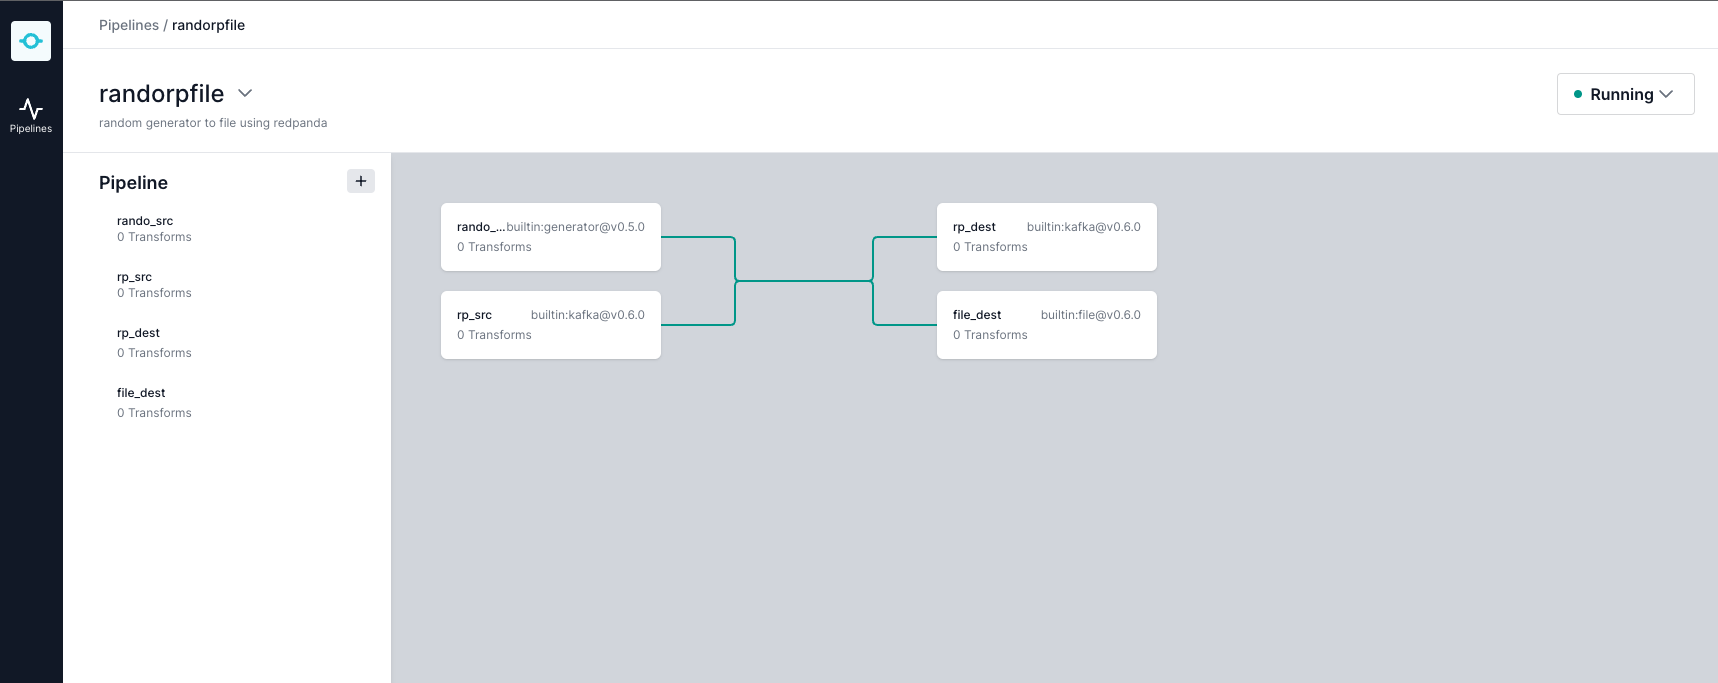
http://localhost:8080to check Conduit's UI and you should see the following:
You can view the data flowing through the Redpanda topic by opening up a new terminal window and running the following command:
$ rpk topic consume conduit-demo --brokers <broker1_addr,broker2_addr,broker3_addr>If everything works correctly, viewing the contents of output.txt should show the same information in the topic.
Conclusion
Conduit and Redpanda offer an alternative that is not only easier on your development team but also on your infrastructure. They eliminate the operational overhead and complexity, freeing you to focus on what really matters—your data and how it drives your business. So if you're looking to make the switch to a more efficient, developer-friendly platform, look no further. Conduit and Redpanda are not just the future of data streaming; they're the smarter choice for today.
Additional Resources
For more information, visit the Conduit Documentation and RedpandaDocumentation. Join our community forums to stay up-to-date and get answers to all your questions.