
Analyzing the changes that occur to PostgreSQL will not only give you insight into the current state of the data within your application but allows you to dig into thechangesof your database.
Materialize is a streaming database that allows you to query real-time streams using SQL.
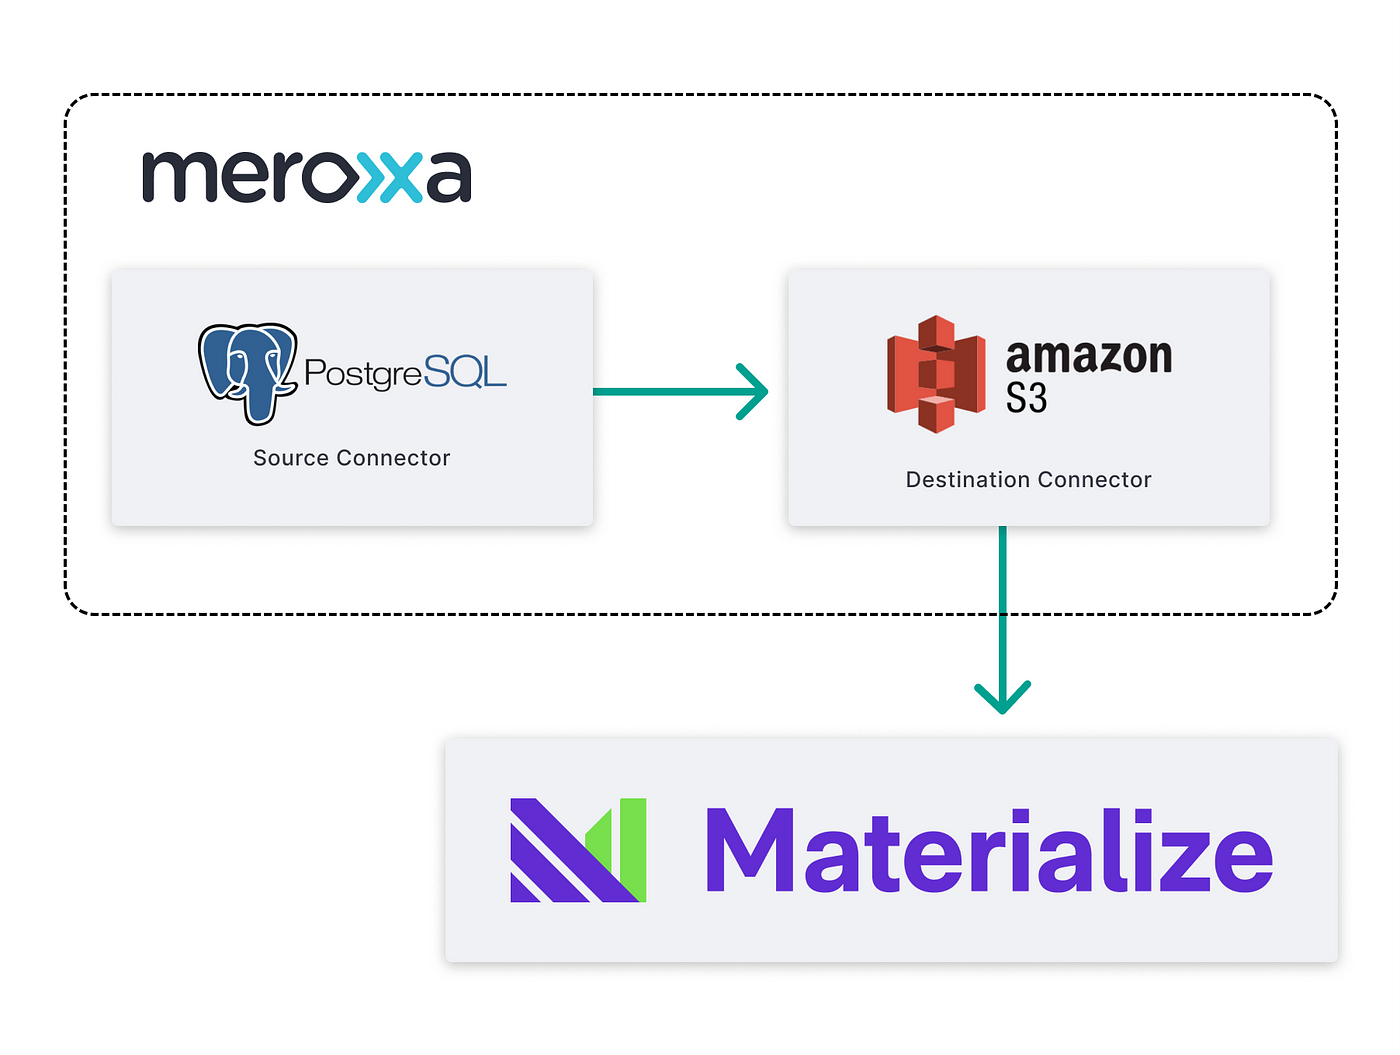
Meroxa is a platform that enables you to build real-time data pipelines to capture Change Data Capture (CDC) events (every insert, update, and delete) from PostgreSQL and othersources.
Together, you can create real-time pipelines in Meroxa to stream data from various sources to Materialize and analyze them usingStreaming SQL. The model described in this post offers a robust foundation for a streaming analytics stack.
How it works
For this example, we will build a query (amaterialized view) to analyze the count of the operations (inserts, updates, and deletes) performed to Postgres.
From a high level, here is how it works:
- First, we build a pipeline to capture CDC events (inserts, updates, and deletes) from a PostgreSQL database and stream the events to Amazon S3.
- Then, add Amazon S3 as a materialized source and build a materialized viewto analyze the CDC events.
The CDC events are streamed to files within a configured S3 bucket as gzipped JSON. Each S3 object contains multiple records, separated by newlines, in the following format:
{
  "schema": {
    "type": "struct",
    "fields": [
      {
        "type": "struct",
        "fields": [
          {
          "type": "int32",
          "optional": false,
          "field": "id"
          },
          ...
        ],
        "optional": true,
        "field": "before"
      }
    ],
    "optional": false,
    "name": "resource_217"
  },
  "payload": {
    "before": {
      "id": 11,
      "email": "ec@example.com",
      "name": "Nell Abbott",
      "birthday": "12/21/1959",
      "createdAt": 1618255874536,
      "updatedAt": 1618255874537
    },
    "after": {
      "id": 11,
      "email": "nell-abbott@example.com",
      "name": "Nell Abbott",
      "birthday": "12/21/1959",
      "createdAt": 1618255874536,
      "updatedAt": 1618255874537
    },
    "source": {
      "version": "1.2.5.Final",
      "connector": "postgresql",
      "name": "resource-217",
      "ts_ms": 1618255875129,
      "snapshot": "false",
      "db": "my_database",
      "schema": "public",
      "table": "User",
      "txId": 8355,
      "lsn": 478419097256
    },
    "op": "u",
    "ts_ms": 1618255875392
  }
}
This record captured from PostgreSQL has two parts: apayload and aschema. Thepayload represents the data captured from the source. In this case, the record contains the operation (op) performed, the data before and after the operation. Also, Meroxa will automatically record theschema of the payload within the record and capture its changes over time.
Prerequisites
Before you begin building, you’ll need:
- PostgreSQL Database (e.g., Amazon RDS).
- AWS S3 Bucket
- Meroxa CLI
- Materialize CLI
Step 1: Adding Resources to Meroxa
To begin, you’ll need a Meroxa account and the Meroxa CLI. Then, you can add resources to your Meroxa Resource Catalog. We can do so with the following commands:
- Add PostgreSQL resource:
$ meroxa add resource postgresDB --type postgres -u postgres://$PG_USER:$PG_PASS@$PG_URL:$PG_PORT/$PG_DB --metadata '{"logical_replication":"true"}'2. Add Amazon S3 resource:
$ meroxa add resource datalake --type s3 -u "s3://$AWS_ACCESS_KEY:$AWS_ACCESS_SECRET@$AWS_REGION/$AWS_S3_BUCKET"
For more details about Meroxa Platform access, permissions, or environment-specific instructions, please see:
Step 2: Building the pipeline
Now that you have a resource within your Meroxa Resource Catalog, we can connect them with the meroxa connect command:
$ meroxa connect --from postgres --input public.User --to datalake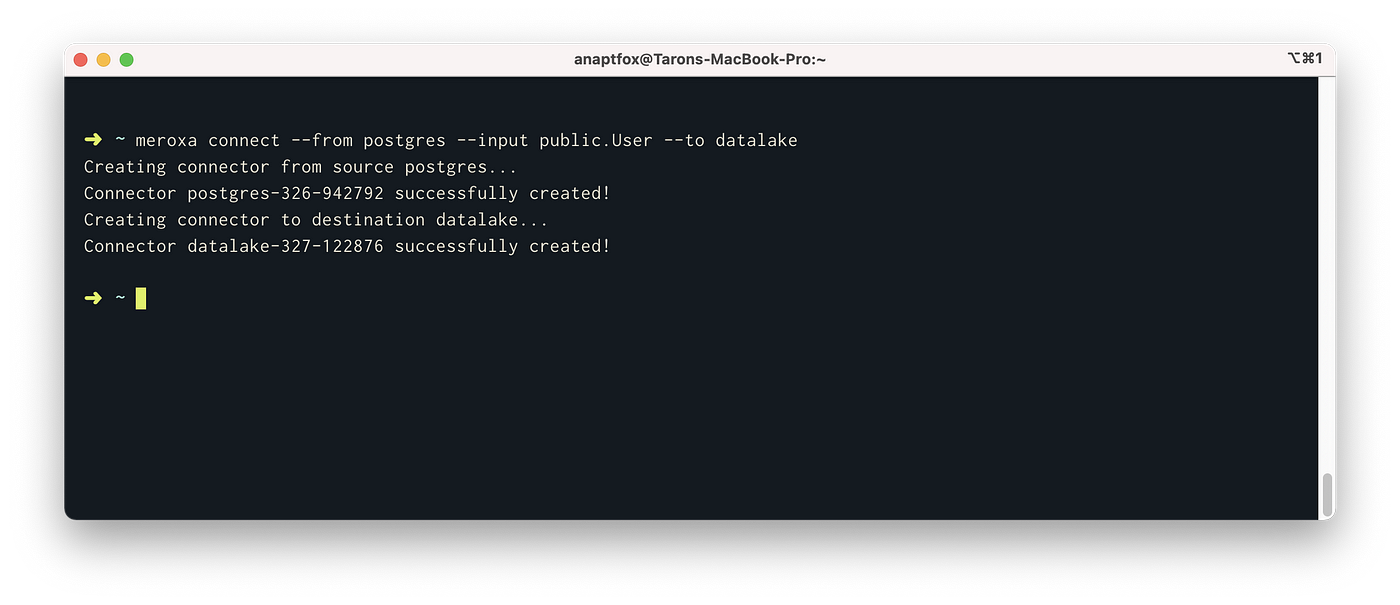
The meroxa connect command will create two connectors for you. Alternatively, you can use the meroxa create connector command to create each one separately.
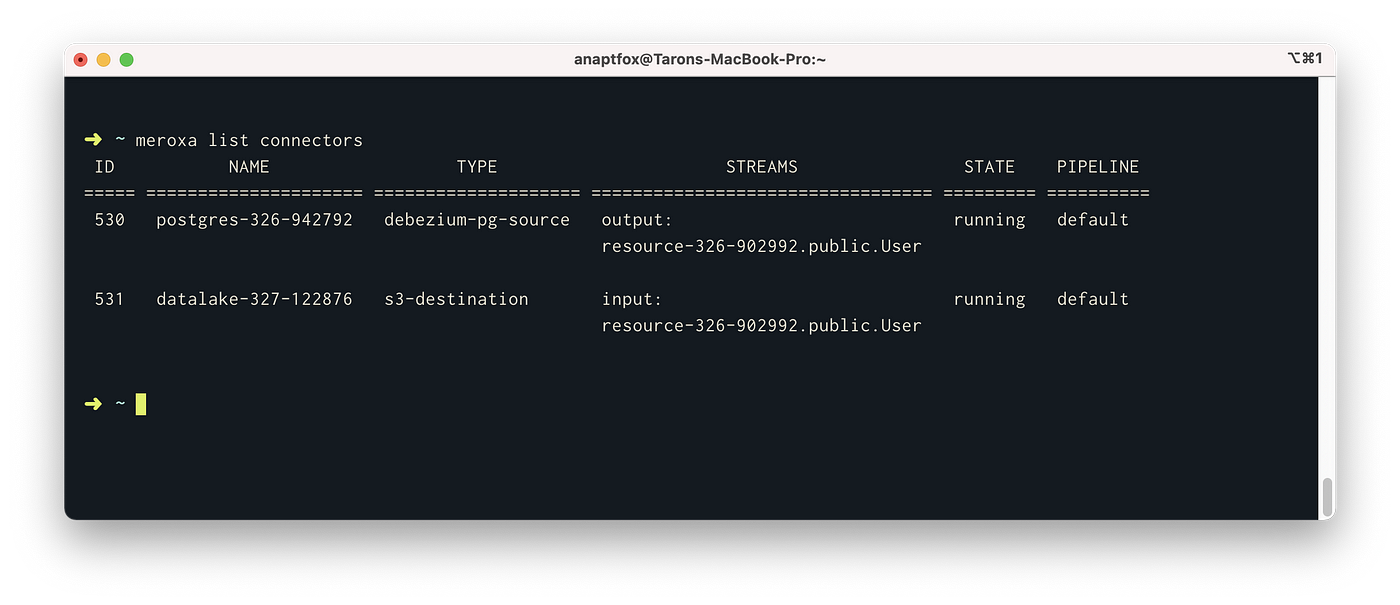
You can view the created connectors with the meroxa list connectors command:
After connecting the resources together, Meroxa will:
- Analyze your resources and automatically configure the proper connectors.
- Perform initial data sync between source and destination.
- Track every insert, update, and delete from Postgres and send to S3 in real-time.
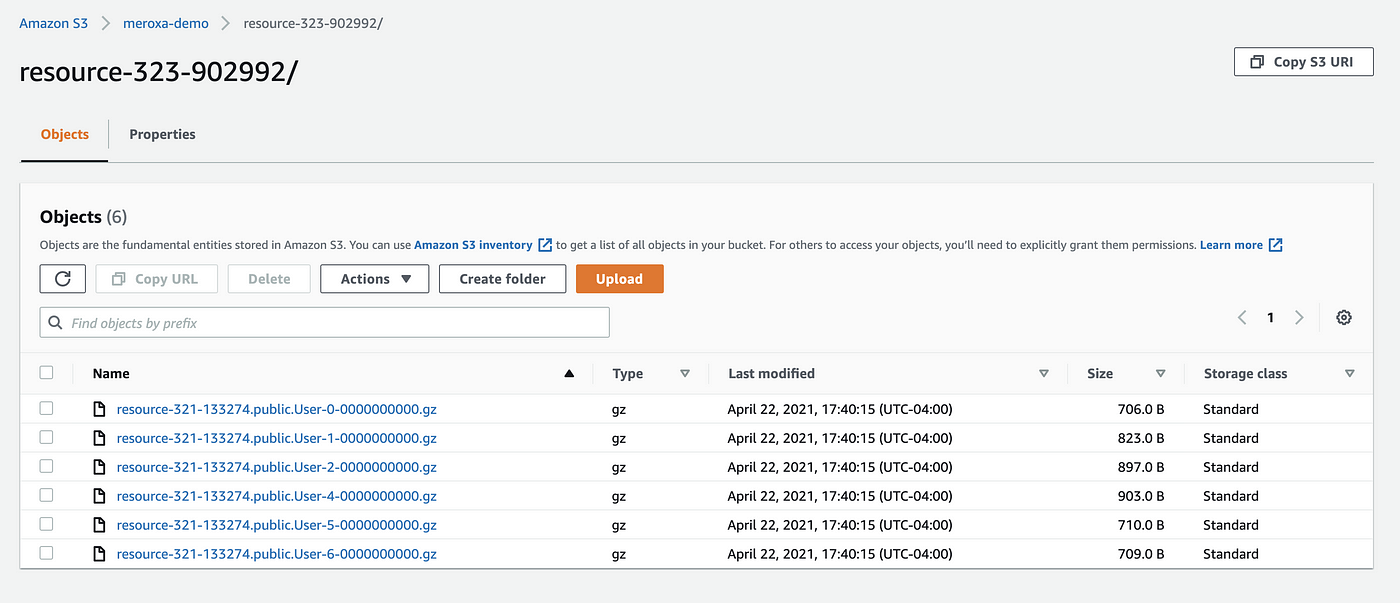
If your pipeline creation was successful, in the S3 bucket you configured, you would see events captured:
We can now add S3 as a source in Materialize.
Step 3: Add S3 as a Materialized Source
Instead of tables of data, you connect Materialize to external sources of data and then create materialized views of the data that Materialize sees from those sources.
In this case, we can add our Amazon S3 bucket as a source:
- First, start the Materialize:
$ materialized -w 1- Next, in another terminal, open
psql:
$ psql -U materialize -h localhost -p 6875 materialize- Create the materialized source:
CREATE MATERIALIZED SOURCE user_cdc_stream
FROM S3 DISCOVER OBJECTS USING BUCKET SCAN 'bucket-name', SQS NOTIFICATIONS 'bucket-notifications', COMPRESSION GZIP
WITH (region = 'us-east-2')
FORMAT TEXT;
This command creates a source from a bucket in S3 called bucket-name.
To listen to changes from S3, Materialize listens to Amazon SQS. Within the command above, we also configure an SQS queue called bucket-notifications. To create a queue: Amazon Walkthrough: Configuring a bucket for notifications (SNS topic or SQS queue).
Lastly, we can inform Materialize that our files in S3 are compressed with GZIP.
For more details on access/configuration, see Materialized S3 + JSON documentation.
Now that we have a materialized source, we can query it like a table using SQL. For example, you can view the columns of our new table like so:
SHOW COLUMNS FROM user_cdc_stream;
Thetext column contains a single CDC record in the format we mentioned in Step 1.
Step 4: Create a Materialized View
Materialize views are built to handle streams of data and let you run super fast queries over that data. Using the following command, we can create a view to parse the JSON record and represent the information in columns:
CREATE MATERIALIZED VIEW user_cdc_table AS SELECT
(val->'payload'->'after'->>'id')::int AS after_id,
(val->'payload'->'after'->>'email')::text AS after_email,
(val->'payload'->'after'->>'name')::text AS after_name,
(val->'payload'->'after'->>'birthday')::text AS after_birthday,
(val->'payload'->'after'->>'createdAt')::bigint AS after_createdAt,
(val->'payload'->'after'->>'updatedAt')::bigint AS after_updatedAt,
(val->'payload'->'before'->>'id')::int AS before_id,
(val->'payload'->'before'->>'email')::text AS before_email,
(val->'payload'->'before'->>'name')::text AS before_name,
(val->'payload'->'before'->>'birthday')::text AS before_birthday,
(val->'payload'->'before'->>'createdAt')::bigint AS before_createdAt,
(val->'payload'->'before'->>'updatedAt')::bigint AS before_updatedAt,
(val->'payload'->'source'->>'connector')::text AS source_connector,
(val->'payload'->'source'->>'ts_ms')::text AS source_ts_ms,
(val->'payload'->'source'->>'db')::text AS source_db,
(val->'payload'->'source'->>'schema')::text AS source_schema,
(val->'payload'->'source'->>'table')::text AS source_table,
(val->'payload'->'source'->>'snapshot')::text AS source_snapshot,
(val->'payload'->>'op')::text AS op,
(val->'payload'->>'ts_ms')::bigint AS ts_ms,
(val->'schema')::text AS schema
FROM (SELECT text::jsonb AS val FROM user_cdc_stream);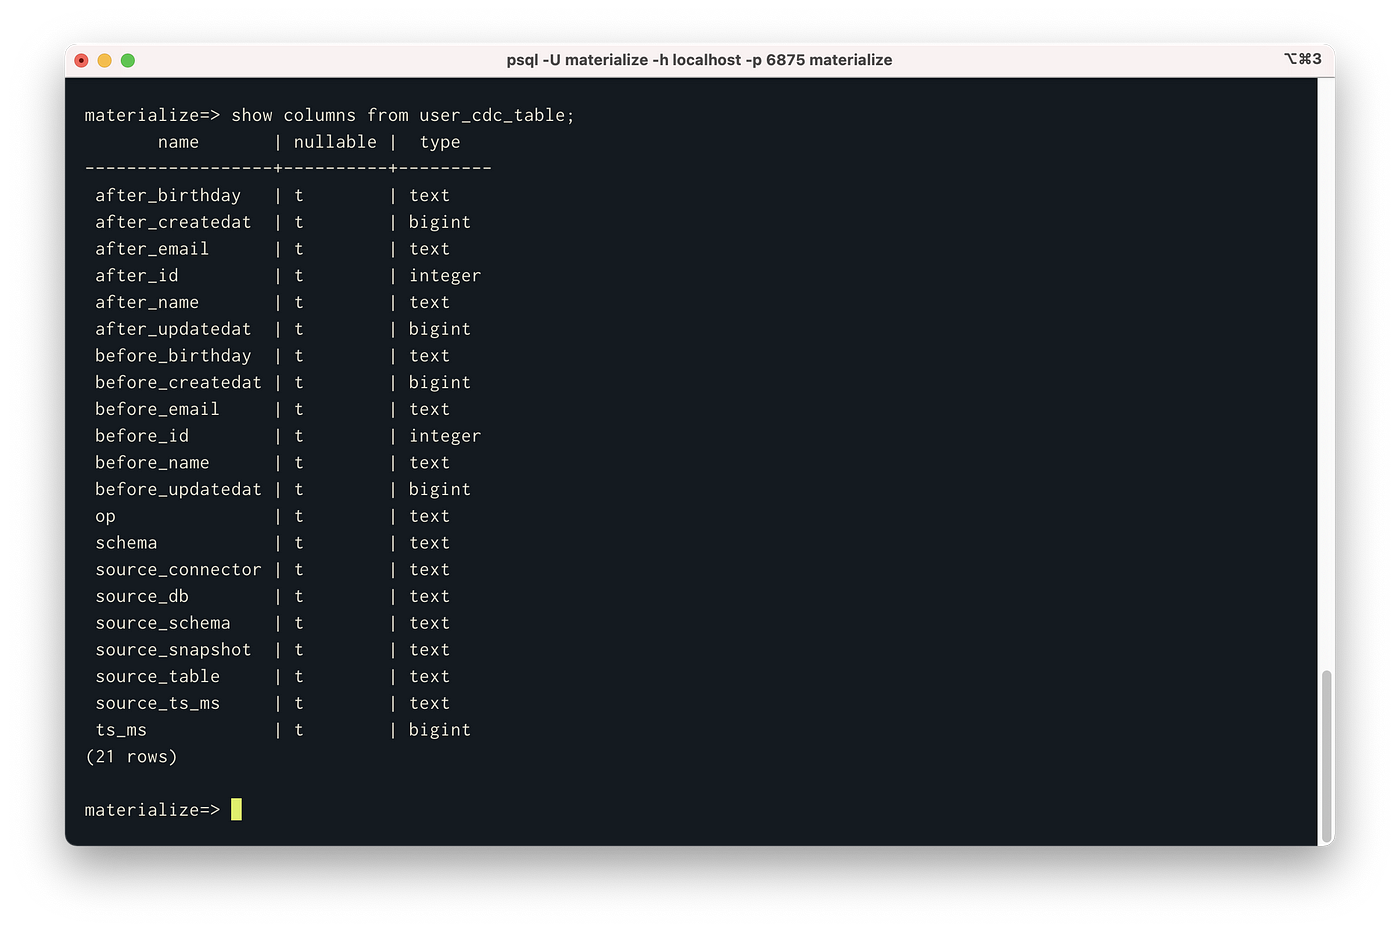
Now, we can act on this view as if it was a SQL table. Let’s say we wanted to see the counts of the different types of operations (inserts, updates, and deletes) occurring to Postgres. We can use the following command:
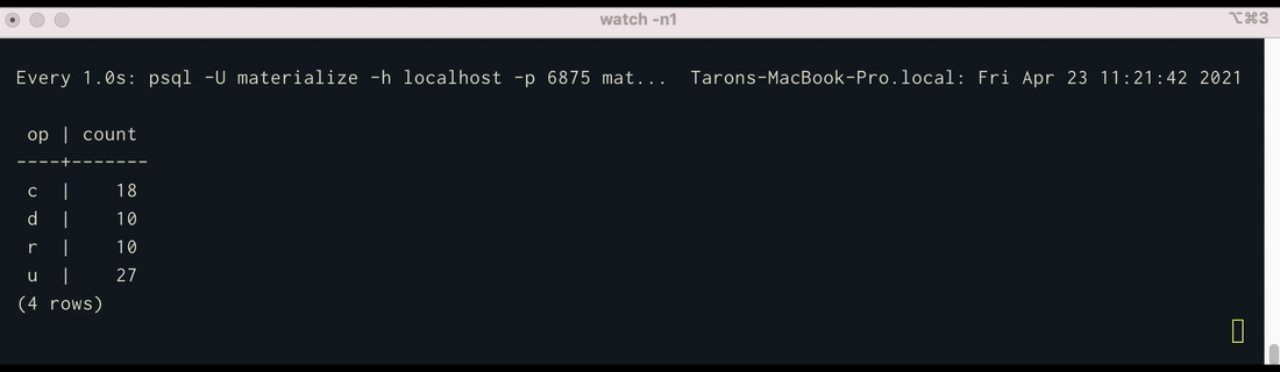
SELECT op, COUNT(*) FROM user_cdc_table GROUP BY op;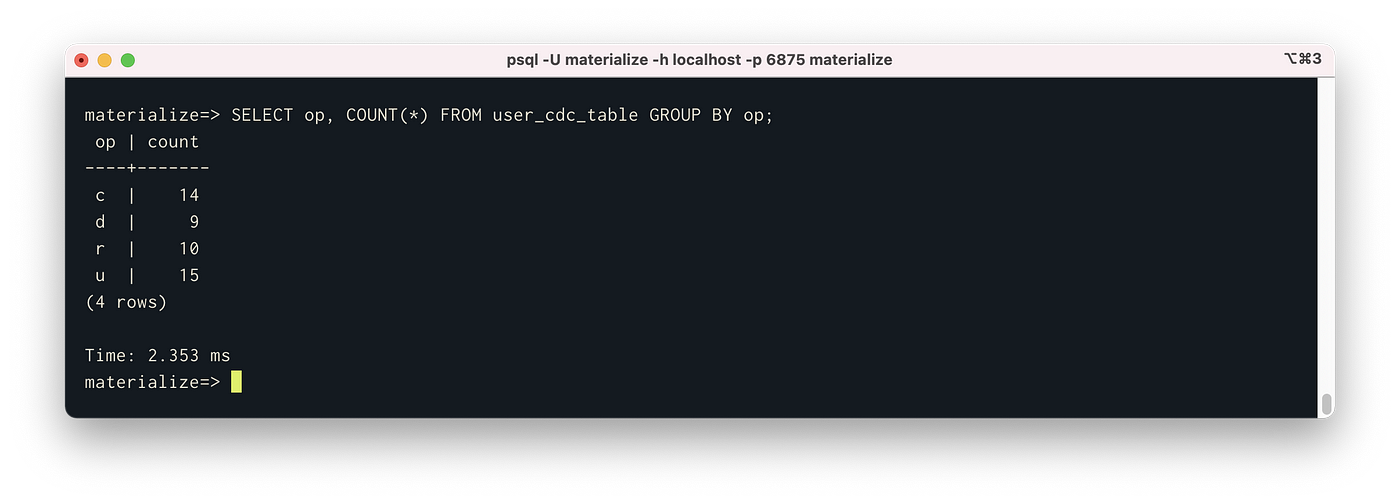
The nice thing is that because materialized views are compostable, we can create another materialized view from queries ofother materialized views:
CREATE MATERIALIZED VIEW op_counts AS SELECT op, COUNT(*) FROM user_cdc_table GROUP BY op;As our queries become more complex and datasets grow, we can continue to create more and more views. They will all be lighting fast and updated in real-time. A great demo to see this timing in action is theMaterialize Demo.
Usingwatch, we can see execute a query inpsql once per second continuously:
$ watch -n1 'psql -U materialize -h localhost -p 6875 materialize -c "SELECT * FROM op_counts;"'What’s Next?
Now that you’ve built a pipeline to stream data from Meroxa to Materialize, you can continue to build your real-time streaming analytics stack. Here are a couple of other things you can do:
- Building more views:materialized views can be used to transform or even duplicate sources into Materialize.
- Adding additional sources:check out other sources in Meroxa (e.g., ElasticSearch). All can be streamed to Materialize using the same steps above.
I can’t wait to see what you build 🚀.
For more information, check out:


